HTML/JavaScript

Google Ads - Ads Google Ads - Ads Google Ads - Ads

Thursday, May 20, 2010

Sweet Chili Chicken Livers

Sweet Chili Chicken Livers (photo)

Okay. I know. Chicken livers are public enemy numero uno for most people. Sandwiched somewhere between Bush and Bin Laden. But way lower on the list than say, tripe. You know - stomachs, brains, eyeballs and other unmentionables. *Shudder*

Livers though? Definitely *not* the same as tripe. It won't hunt you down and give you nightmares. Nor will it remind you of monsters and other creatures of the undead. Promise.

Instead it will charm your tastebuds with its delectable richness. Make you squeal with delight at it's smooth creaminess. Full-fat cream has nothing on livers, I tell ya. Livers are the foodie world's Mr I'm-Too-Cool-To-Care when it comes to cholesterol. Because actually it is insanely good for you. Have you had a  look at those nutritional stats down below? Scroll down further. Riiiiiiight at the bottom. You see that? Nutritional rockstardom if ever there was such a thing. Cholesterol be damned.

Sweet Chili Chicken Livers (photo)

Now that we've set the health nuts at ease, let me tell you about this little number here. It is so ridonkulously easy, cheap and quick to whip up that you will wonder if you've missed something. It'll make you doubt yourself and double check the recipe. Twice. But one bite of the end result and your doubts will fly right out of the window. Money-back guaranteed.

And dare I say: it makes livers seem... almost... sexy?

For these are chicken livers at their absolute mouthwatering best. Quickly seared, then cooked to perfection in a spicy-sweet tomato based sauce, quick 'n easy doesn't get much better than this. Making it the perfect go-to meal to whip up when you've got unexpected guests. And leaving you with enough time to regale them with crazy stories about your old enemy tripe. Or, if all else fails, impress them with your nutritional knowledge regarding livers. Knowledge is sexy you know.

Sweet Chili Chicken Livers (photo)

Sweet Chili Chicken Livers
Serves 6 - 8 as starter or 4 as main

1 1/2 tbsp olive oil
1 small onion, finely chopped
2 tsp garlic, minced>
500g chicken livers
2 tins (410g each) peeled, chopped tomatoes
1/4 cup sweet chili sauce
1/4 - 1/2 tsp dried red chili flakes
salt and freshly ground black pepper to taste
garlic chives, chopped (optional)

1. Heat half a tablespoon olive oil in a saucepan over medium-high heat. Add onion and garlic, sauteeing until glazed and see through. Remove and set aside.
2. Add another half a tablespoon of oil, increase heat to high and quickly sear half the chicken livers. Remove and set aside, then repeat with remaining oil and chicken livers.
3. Return onion to the saucepan, along with tomatoes, sweet chili sauce and chili flakes. Bring to a boil, cover and allow to cook over medium-high heat for about 10 minutes or until thickened.
4. Add livers to the sauce, turn heat down, and allow to simmer, partially covered for 5 - 10 minutes or until livers are cooked through to your liking. Garnish with chopped chives and serve with a rustic loaf of bread.  

Nutritional info (per serving): Calories 340.3, Total fat 13.5 g, Saturated fat 3.2 g, Polyunsaturated fat 2.0 g, Monounsaturated fat 5.5 g, Cholesterol 705.0 mg, Sodium 295.8 mg, Potassium 426.8 mg, Total carbohydrate 17.7 g, Dietary fiber 0.3 g, Sugars 5.5 g, Protein 35.2 g
Good source of: Vitamin B12 440.2 %, Vitamin A 359.5 %, Folate 175.8 %, Riboflavin 170.4 %, Selenium 157.9 %, Pantothenic Acid 104.2 %, Iron 89.9 %, Niacin 87.2 %, Phosphorus 56.0 %, Vitamin B6 54.4 %

Sunday, May 16, 2010

Green Chili and Chicken Enchiladas

(photo)Daring Cooks - Green Chili and Chicken Enchiladas


Yes it's that time of the month again friends: time to dust of our aprons, sharpen our knives and get daring. Daring with a capital "D" that is!

Our hosts this month, Barbara of Barbara Bakes and Bunnee of Anna+Food have chosen a delicious Stacked Green Chile & Grilled Chicken Enchilada recipe in celebration of Cinco de Mayo! The recipe, featuring a homemade enchilada sauce was found on www.finecooking.com and written by Robb Walsh.

Truth be told the concept of enchiladas wasn't all that daring to me, as I've ventured down that road before. However the real challenge was making your own Mexican style sauce to use in the enchiladas and this was definitely worth the effort. I ended up butchering this challenge (out of necessity) to adapt to what I could procure locally and tomatillos,  unfortunately, was not one of those things. Neither was corn tortillas. Corn tortilla chips I could find by the truckload but a plain tortilla? No dice. 

I bravely attempted to fashion my own corn tortillas using maize flour - I figured, it couldn't be too different from the masa harina normally used to make this. Wrong. Wrong wrong wrong wrong wrong. Don't even attempt this. Unless you want to end up with a mushy, white bowl of flour sludge. Not an appetising thought.

In the end I decided to abandon the stacked enchilada concept as advocated by the sample recipe in favour of the more traditional rolled enchiladas. For which I could use the easily obtainable flour tortillas. The tomatillos was substituted by green (i.e unripe) tomatoes with added lemon juice, as suggested by our resident Daring Kitchen expert, Audax.

And that was it folks. After overcoming these obstacles the recipe came together easily and relatively quickly. I was a bit apprehensive regarding the large (to me) quantity of chillies, but even though chili sauce was fiery on it's own, it was spicy perfection in combination with the chicken and tortillas. Which just proves again - homemade is always superior. Thanks Barbara & Bunnee for an awesome challenge!

Green Chilli and Chicken Enchiladas
Adapted from Fine Cooking (written by Rob Walsh)
Serves 4

8 small green chillies
5 medium green tomatoes, roughly chopped
2 cloves garlic
4 cups chicken broth
1 tsp dried oregano
1/2 tsp salt
1/4 tsp black pepper
2 tbsp cornstarch (dissolve in 2 tablespoons water, for thickening)
2 skinless boneless chicken breasts, cooked and shredded
60g yellow pattypan squash (summer squash), coarsely grated
170 g gouda cheese, grated
salt and pepper to taste
3 1/2 large flour tortillas (25cm/2 inch diameter)
fresh coriander (cilantro) for garnish, chopped 

1. Place chillies, tomatoes and garlic on a oven tray. Broil for 10 - 15 minutes or until tomatoes are softened and chillies blackened.
2. Peel skins off chillies, slit open and remove seeds. Add chillies to a blender along with tomatoes and puree.
3. Removed pureed tomato-chili mixture to a saucepan and squeeze the roasted garlic into the sauce. Add oregano, salt, pepper and chicken broth, mix through and bring to a boil. Reduce heat and allow to simmer for 10 minutes.
4. Add the cornstarch/water mixture and stir well. Simmer, stirring occasionally, until the sauce is thickened and reduced to 4-5 cups (this will take approximately 10 - 15 minutes).
5. Taste, adjusting seasonings if needed. Set aside.
6. Preheat oven to 180C. Mix together the chicken, squash and half of the cheese for the filling, lightly seasoning with salt and pepper to taste.
7. Spoon half of the sauce into the bottom of a rectangular ovenproof dish, large enough to hold all the enchiladas.
8. Cut tortillas in half, then add a large spoonful of filling to each half, and lightly roll up. Tightly pack into the ovenproof dish, atop the sauce.
9. Spoon over the remainder of the sauce and place enchiladas in the oven for 15 minutes. Remove briefly, topping with the remainder of the cheese, then return to the oven for another 5 minutes or until cheese is melted and bubbling. Garnish with chopped coriander (cilantro) and serve while still hot.

Nutritional info (per serving): Calories 506.3 , Total fat 19.5 g, Saturated fat 9.9 g, Polyunsaturated fat 2.0 g, Monounsaturated fat 8.4 g, Cholesterol 90.0 mg, Sodium 2,014.7mg, Potassium 1065.3 mg, Total carbohydrate 49.7 g, Dietary fiber 4.3 g, Sugars 8.5 g, Protein 33.5 g

Good source of: Phosphorus 63.8 %, Vitamin C 62.0 %, Selenium 55.8 %, Calcium 36.8 %, Thiamin 33.5 %, Riboflavin 33.5 %, Vitamin B6 30.3 %, Folate 28.3 %, Iron 25.5 %,

Tuesday, May 11, 2010

Vietnamese Chicken and Pineapple Soup

Photo of Vietnamese Chicken and Pineapple Soup

It is freezing in the Western Cape at the moment. Yes, I know I proclaimed my love for winter just the other day, but it would be nice if the temperature could be dialed up to juuuust a notch above freezing. Just saying.

This month Joanne from Eats Well with Others chose Vietnam as the theme for the Regional Recipes event and when I saw that I did a silent "hell yeah!" in my head. Because you see, I  love asian food. Chinese take out (the greasier the better), all-you-can-eat buffets and tempting noodle-y dishes at our local Thai place, you name it, and I'll probably like it. Sad thing though: I tend to not cook a lot of asian food at home. Yes I do the odd stirfry, but that's where it stays. Mostly.

So this was the perfect opportunity for me to get out of my rut and into my kitchen. Except it was really cold yesterday. And while Asian foods are many things, comforting is not the first word that springs to mind. Or maybe I've just been ignorant so far?

Photo of Vietnamese Chicken and Pineapple Soup

Nevertheless I set off without fear or trepidation into the hallowed halls of the internet where I stumbled across a vast array of warming soups and even a curry or two. Comfort meal? Hells yeah! But one stood out. Vietnamese Chicken and Pineapple Soup. Yes, okay, the reason I was attracted to it, was because of the odd combination. Pineapple? In soup? Eh... 

But it works! Oh and does it ever. TheHusband and I slurped this motley crue of ingredients right up. And we want more. MOAR I say! Any volunteers for making me another batch?

Photo of Vietnamese Chicken and Pineapple Soup


Blazing Hot WokI'm submitting this to Regional Recipes - Vietnam, hosted by Joanne from Eats Well with Others.
Vietnamese Chicken and Pineapple Soup
Adapted from Pots & Pearls
Serves 4

2 small pineapples
approx 8 cups water
2 tbsp sunflower oil
1 - 2 tbsp dry red chilli flakes
3 tsp minced garlic
1/4 cup + 2 tbsp fish sauce
1 lemongrass stalk
120g fresh shiitake mushrooms, thinly sliced
2 large tomatoes, chopped
1 tsp black pepper
2 skinless boneless chicken breasts (approx 250g)
200g rice noodles, softened
1/4 cup fresh basil, roughly chopped
1/4 cup fresh mint, roughly chopped

1. Peel and core pineapples, discarding only the peel. Chop the cores and puree with 1/2 cup of water in a blender. Strain using a sieve and pressing down on the solids to extract the most liquid. Discard the solids and set the juice aside. Chop the remaining pineapple pieces and set aside as well.
2. Heat 1 tbsp oil in a large pot, then fry the chillies and 2 tsp garlic for a minute or two until fragrant. Add 1/4 cup fish sauce and cook another 2 minutes to reduce.
3. Add enough water to the pineapple juice to make up 8 cups, then add to the pot with the lemongrass stalk.
4. Bring to the boil, then add mushrooms, tomatoes, reserved pineapple pieces and 1/2 tsp pepper. Return to the boil, then cover and allow to simmer for 10 minutes.
5. Meanwhile, heat the remaining oil in a frying pan, add rest of garlic, along with a pinch of chilli flakes and the remaining 2 tbsp of fish sauce. Cook 2 minutes or until reduced, then season chicken with 1/2 tsp pepper and add to the pan, frying briefly until just cooked.
6. Stir chicken into the soup and simmer for 1 minute.
7. Divide noodles amongst serving bowls, then ladle in the steaming hot soup. Sprinkle with chopped herbs and serve.

Nutritional info (per serving): Calories 327.5, Total fat 8.8 g, Saturated fat 0.8 g, Polyunsaturated fat 4.9 g, Monounsaturated fat 1.5 g, Cholesterol 33.8 mg, Sodium 2236.7 mg, Potassium 577.9 mg, Total carbohydrate 50 g, Dietary fiber 5.3 g, Sugars 24.4 g, Protein 16.3 g 

Good source of: Manganese 212.2 %, Vitamin C 80.0 %, Magnesium 23.8 %, Vitamin E 20.1 %

Tuesday, April 20, 2010

Nutty Chicken Pilaf

Nutty Chicken Pilaf

*insert catchy opening hook here*

Did that work? Seems you're still here. And they say blogging is hard. Pfft. I could do it with my eyes shut and one arm tied behind my back. Except um.. there might be a helluva lot of typos. Not to mention I'd be rather uncomfortable. Okay, scratch that idea then.

How about I show you a great recipe to use up leftover cooked rice instead? You in? Yup, I knew that I couldn't be the only habitual over-estimator when it comes to rice quantities. The problem is, those little grains are deceptive. They increase in volume during the cooking process. Devious little buggers.

Nutty Chicken Pilaf

One day I'll learn how to make just enough rice. Promise. Until then though, I can take advantage of my inherent rice-making flaws with meals that make the best of the leftovers. And comes together in a matter of mere minutes. Perfect for weeknights.

This nutty chicken pilaf is pretty straightforward to make and it reaps some handsome flavour rewards what with all that crunchy nut and seed action going on. You could use any combination of nuts in this dish, but I think the more exotic ones work best. The pattypan squash can easily be substituted by babymarrow (my original plan) or fried mushrooms to mix things up a little.

Nutty Chicken Pilaf

Nutty Chicken Pilaf
Serves 4

1 tbsp (15 ml olive oi)
1/2 medium onion, finely chopped
3/4 medium green bellpepper, finely chopped
2 chicken breast fillets (approx 250g), thinly sliced
3/4 chicken stock cube
pinch ground nutmeg
1/4 - 1/2 cup (60 - 125ml) water
3 cups cooked brown rice (I used a mixture of brown, wild and red rice)
125g pattypan squash (yellow summer squash)
salt & pepper, to taste
2 tbsp (30 ml) lemon juice
120g mixed nuts, fruit & seeds (I used a mix of pumkin seed, sunflower seed, almonds, cranberries & pistachios)
a few parsley sprigs, chopped

1. Heat olive oil in a large fryingpan and saute onion and greenpepper for 3 - 4 minutes until just starting to soften.
2. Add chicken strips and cook a further 5 minutes until just cooked through.
3. Add stock cube, nutmeg and 1/4 cup water, cook for a minute or two to dissolve the stock cube, then add rice and squash.
4. Cook another 3 - 4 minutes or until rice is heated through and squash cooked. Taste and adjust seasoning if needed. Finish off by adding lemon juice, then stir nuts and seeds through and sprinkle with chopped parsley.

Nutritional info (per serving): Calories 457.1, Total fat 21.6 g, Saturated fat 3.1 g, Polyunsaturated fat 3.7 g, Monounsaturated fat 12.1 g, Cholesterol 36.3 mg, Sodium 47.3 mg, Potassium 540.5 mg, Total carbohydrate 45.1 g, Dietary fiber 5.8 g, Sugars 0.6 g, Protein 23.7 g

Good source of: Niacin 42.5 %, Manganese 32.7 %, Phosphorus 26.7 %, Vitamin C 25.4 %, Vitamin B-6 24.0 %, Magnesium 23.1 %,

Tuesday, April 13, 2010

Brunswick Stew

Brunswick Stew

I still can't believe it. I *actually* went to the store and I bought a piece of warthog. Not many people will have the balls to pick up a packet of warthog meat, nevertheless actually buy the thing. I don't even have to mention the actual cooking and eating part do I?

As the cashier so eloquently put it (with slightly raised eyebrows I might add) "Is it for dog food?"
My answer? A slightly embarassed "No".

But why should I feel embarrassed? I should feel heroic for going where no (sensible) (wo)man has gone before! To infinity and beyond! Or something like that anyway... In all seriousness though I did have a little bit of "WhatTheHellAmIDoing" going on while heading home with my warthog tucked securely in a plastic shopping bag. The whole experience seemed a bit surreal and the smell of the raw warthog meat when I removed it from it's wrapping wasn't exactly enticing. It didn't smell bad, but it sure did smell.... odd. Wild is probably a better word. Which is to be expected. It is after all a wild animal.

I have a very vivid imagination and it didn't help that I was picturing a crazed warthog face the whole time while chopping the meat up. Thankfully the crazed warthog stayed locked in my mind though...


So you're probably dying to know: Why Warthog? Why it's for the Daring Cooks challenge of course! You didn't think I was crazy enough to attempt something like this of my own volition, did you?

The 2010 April Daring Cooks challenge was hosted by Wolf of Wolf’s Den. She chose to challenge Daring Cooks to make Brunswick Stew. Wolf chose recipes for her challenge from The Lee Bros. Southern Cookbook by Matt Lee and Ted Lee, and from the Callaway, Virginia Ruritan Club.

Wolf gave us some history on Brunswick Stew:

"Brunswick Stew has a long, and oft debated history. Brunswick, Georgia claimed that the first Brunswick Stew was created there in 1898. There is, at the Golden Isles Welcome Center on Interstate 95, a bronzed stew pot with a plaque proclaiming this fact.

However, Brunswick, Virginia claims that the first Brunswick Stew was created there by a camp cook named Jimmy Matthews in 1828, for a hunting expedition led by Dr. Creed Haskings, a member of the Virginia State Legislature for a number of years.

Every year, there is an Annual Brunswick Stew Cookoff that pits ‘Stewmasters’ from both Virgina and Georgia against their counterparts, and takes place every October in Georgia. The Brunswick Stewmasters recipe says *exactly* what is used in competion stews, and states that 'Adding any additional ingredient(s) will disqualify the stew from being an original Brunswick Stew.'

However, most agree that, Brunswick stew is not done properly 'until the paddle stands up in the middle.'

Brunswick Stew

The stew was actually pretty easy to make. You know once I got rid of the crazed warthog image... It's a lengthy process sure, but involves very little legwork on the cook's part. You just brown all the meat, add the stock, potatoes and carrots, then cook for about an hour and a half. Then you add the rest of the ingredients and cook for another half an hour. Simple.

The end result? A flavourful hodgepodge of ingredients that will happily sate an empty belly. Even if mine wasn't thick enough to hold a paddle standing in the middle...

Brunswick Stew
Serves 6 - 8

The original recipe calls for rabbit, but I opted to add a little South African flavour instead. Warthog is very similar in taste and appearance to ostrich, though somewhat drier. I have no idea what part of the warthog I used, but it was a longish flat piece with no bones in, I suppose you could call it a fillet.You can substitute the warthog with any other venison (or use rabbit if you're able to find it where you live).

3 tbsp olive oil
50g bacon, roughly chopped
750g chicken pieces on the bone, skinned
350g warthog*, cut into chunks
1 tbsp salt
4 cups chicken stock 
4 potatoes, peeled & cut into chunks
3 carrots, peeled & cut into chunks
1 large onion, finely chopped
1 tsp chilli flakes
1 bay leaf
1 1/2 cups whole corn kernels (drained if using canned)
2 cups butterbeans (drained if using canned)
2 tins whole tomatoes in puree, drained (reserve juice for another use)
tabasco sauce, to taste (optional)

1. Dry-fry bacon over high heat in a large enough saucepan to accomodate your stew. Remove when browned, and set aside.
2. Add half the olive oil to the saucepan and sear (brown) the chicken pieces on all sides, then remove and set aside with the bacon. Repeat the process with the warthog pieces. Carefully salt the seared meats.
3. By now you should have sticky brown bits in the bottom of your pan. Add the chicken stock, stirring to loosen up all the flavourpacked brown bits, then allow to reduce by at least half.
4. Return your meat to the pan, adding the rest of the stock, as well as the potatoes, carrots, onion, chilli flakes and bay leaf. Bring to a boil, then reduce heat and cover with lid, allowing the stew to simmer for about an hour and a half. The chicken should be falling off the bone and the warthog and vegetables should be quite soft.
5. Using two forks, shred the chicken and warthog finely. I did this in the saucepan, but you might find it easier to remove the meat first. If you removed the meat, add it back to the pan.
6. Add the corn, butter beans and tomatoes to the stew, bring to the boil, then reduce heat and cover with a lid. Cook for another half an hour to forty-five minutes. Taste, adjusting seasoning if needed and optionally add tabasco sauce to your liking.

Serve as is or with rice or bread to mop up the juices.

Tuesday, March 23, 2010

Chicken Pad Thai

Chicken Pad Thai

I have perfected Pad Thai. Now before you turn way from what you think is some empty claim, hear me out.

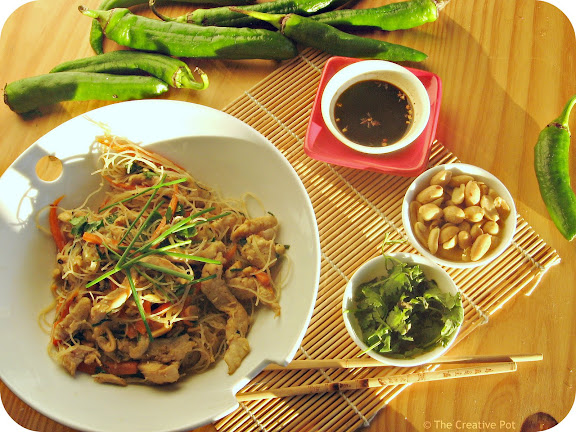
Pad Thai was something I thought you just threw together. Much like any other stirfry. Nothing to it, right? Fry a few things, add some sauce, mix with noodles. Oh but there's so much more to a good Pad Thai! Let me be clear about it though - It.Is.Not.Difficult. Or time-consuming. Or even complicated. But there's a certain order to a proper Pad Thai. You're aiming for the perfect mix of crunchy sprouts and nuts, succulent chicken, fresh green herbs and saucy, glistening noodles. For you to sluuuuurp up.

Chicken Pad Thai

For this recipe you have to be quick. This is not the time for a leisurely glass of wine and an occasional peek into the pot to see how things are doing. The entire thing will come together in about twenty minutes. And this is one time that you absolutely must have everything ready prepped beforehand. No compromises. I like to pretend that I'm a celebrity chef on television, so it feels less food-geeky.

The verdict? I think I have a new favourite meal. As for TheHusband? He likes the flavour, but "The noodles have a weird texture". Eh, what does he know. I think the pictures speak for themselves on this one!
Chicken Pad Thai

I'm submitting this to Weekend Herb Blogging #226, hosted by Erbe in Cucina (Cooking with Herbs).
Chicken Pad Thai
Adapted from Chez Pim
Makes 2 generous servings

1 1/2 tbsp (22.5 ml) sunflower oil
2 boneless skinless chicken breasts (approx 250g), thinly sliced into strips
2 small carrots, julienned
100g rice vermicelli noodles 
1/2 cup Pad Thai sauce*
a handful (approx 40g) beansprouts
1 egg
2 tbsp roasted and salted peanuts, roughly crushed using pestle & mortar
a handful fresh chives, snipped into pieces
a handful fresh coriander (cilantro)

1. Heat 1 tablespoon oil over high heat in a large wok. 
2. Add chicken and cook briefly, stirring vigorously, until just starting to brown.
3. Meanwhile set your noodles in a bowl of warm water to soak. The noodles should just start to become pliable and lose their crispness, but should not be soft before you add it to the wok.
4. Add carrots to the wok and again cook briefly, stirring all the time to keep the food moving, until carrots starts to soften slightly - note it should still be mostly crisp!
5. Now add your (not entirely soft) noodles to the wok, along with the remainder of the oil, stir briefly to coat with oil, then add sauce and stir, cooking for a few minutes until the noodles are cooked. This shouldn't take more than 2 - 3 minutes. Add beansprouts as well during this time.
6. Move the noodles up to the sides of the wok and crack an egg into the bottom of the wok. Leave to solidify slightly for approx 30 seconds, then stir the egg so that it scrambles and cooks through. This will take another 1 - 2 minutes. The egg should still be slightly soft and not cooked dry.
7. Stir again to mix the egg into the noodles, then add peanuts, chives and coriander. Stir everything one last time to combine, then serve at once, accompanied by lemon wedges and little bowls of soy sauce, chillies, peanuts and coriander.

*You can make your own Pad Thai sauce using a combination of fish sauce, palm sugar, tamarind pulp and chillies or cheat and use store bought.

PS: Do check out Chez Pim's post on Pad Thai for beginners - she does a great job of explaining the whole process in great detail.

Nutritional info (per serving): Calories 563.5, Total fat 24.4 g, Saturated fat 3.3 g, Polyunsaturated fat 11.1 g, Monounsaturated fat 6.2 g, Cholesterol 178.8 mg, Sodium 1,029.6 mg, Potassium 540.0 mg, Total carbohydrate 47.1 g, Dietary fiber 2.8 g, Sugars 28.4 g, Protein 35.6 g

Good source of: Vitamin A 196.4 %, Niacin 78.1 %, Selenium 47.5 %, Vitamin B6 41.3 %, Vitamin E 41.2 %, Phosphorus 34.9 %

Thursday, March 11, 2010

Curried Chicken Salad on Spicy Chickpeas


Okay I know, I know. Multiple sections on a salad recipe?? That ain't right. You know what else ain't right?

The fact that it's only Thursday today. Where are you weekend?
Or how about the fact that it's still 10 more days to go until the CTFBC? Yes I'm counting..
Or that our little kitty has now started jumping onto our balcony's ledge?

*shudder* Be still my beating heart.


I'll admit, I also thought it was a bit much when I stumbled upon the recipe over at Epicurious. Four separate phases? You've got to be kidding me right? But you know what, it's really not that bad. Mmmm... I see I haven't convinced you yet, have I? Okay how about this - all the parts are super easy to do and don't take more than a few minutes. Better? Yeah I thought so... 

Do try this recipe though - it really is quite good for a casual weeknight meal.

Curried Chicken Salad on Spicy Chickpeas
Adapted from Epicurious
Serves 4 (generously)

For the curried chicken:

1 onion
1/2 tbsp garlic
1/2 tsp ginger
1 1/2 tsp olive oil
1 tbsp curry powder
1 tsp ground cumin
1 1/2 tsp salt
2 tomatoes, finely chopped
1 cup plain low fat yogurt
2 cups shredded, cooked chicken

1. Saute onion, garlic and ginger in oil until onion starts to soften. 
2. Add curry, cumin, salt and tomatoes. Cook over medium heat until sauce thickens.
3. Stir yogurt in, then add chicken, mixing evenly
4. Cover and set aside to cool to room temperature.

For the spicy chickpeas:

2 cups cooked chickpeas
1 tsp olive oil
1 tsp cumin
1/2 tsp turmeric
1/4 tsp cayenne pepper

1. Heat oil in a frying pan over medium heat. 
2. Add chickpeas and spices, and fry for about 5 minutes or until fragrant
3. Remove from heat and cool to room temperature.

For the cucumber & grape salsa

1 cucumber, chopped (remove seeds)
1 cup green grapes, halved
2 tbsp mint, finely chopped
1/2 tsp salt

1. Mix everything together, then set aside until assembling the salad.

For assembly:

1/4 cup roasted almonds, chopped

1. Spoon salsa into individual serving plates. 
2. Top with a spoonful of chickpeas and a dollop of the chicken salad, then scatter with almonds and serve.

Nutritional info (per serving): Calories 447.2 , Total fat 12.0 g, Saturated fat 2.2 g, Polyunsaturated fat 2.4 g, Monounsaturated fat 6.1 g, Cholesterol 72.1 mg, Sodium 1,294.1 mg, Potassium 1,068.7 mg, Total  carbohydrate 41.1 g, Dietary fiber 8.1 g, Sugars 12.2 g, Protein 39.8 g

Good source of: Niacin 71.6 %, Vitamin B6 69.6 %, Manganese 62.7 %, Phosphorus 51.5 %, Selenium 39.4 %, Vitamin C 33.9 %

Monday, February 8, 2010

Spa Salad with Chicken & Coconut


Does the end ever justify the means? Here's a (not entirely hypothetical) example: 

A (not very likeable, semi-useless) colleague applies for a new job. Said colleague really likes the new job, but would need more money to cover their running expenses. Colleague then asks for your advice regarding salary negotiations. Do you: 

a) Say, yes of course, ask for more - you deserve it!
b) Point out that the salary on offer is actually quite reasonable for the work expected and he/she can't really ask for much more.


Rock & a hard place, right? Option b is technically the correct answer, but option a will get the irritating colleague out of your hair (and soon!)- a case of good bye and good riddance!

Any guesses as to which option I chose? Cue guilty look...

Unlike my lovely colleague, chicken salad is something that I definitely do not want to banish from my life. In fact, I don't think you can ever really get enough of a good chicken salad.

This particular incarnation is one I've been making for a few years now. First gleaned from the pages of an old Marie Claire magazine, I've chopped and changed a little bit since then. The flavours are clean and fresh and reminds me of the type of food that you would eat at a spa (or at least what I imagine spa food would be like!), hence the name.

Spa Salad with Chicken & Coconut 
Adapted from Marie Claire magazine

Serves 3

2 chicken breasts 
1 tsp sunflower oil
3 tbsp lemon juice
3/4 cup low fat coconut milk
1 tsp sugar
2 tbsp finely chopped lemongrass (optional)
200g green beans, trimmed & halved
1/3 large cucumber, pips scooped out & sliced 
100g mangetout (snowpeas), halved lengthways
1/4 cup fresh mint, torn
1/2 tsp dried chili flakes
1 tbsp dried coconut flakes
2 tbsp sesame seeds 
salt, to taste.

1. Preheat the oven to 180C. Mix sunflower oil with 1 tbsp lemon juice. Pour over chicken breasts and toss to coat. Place chicken in a small baking dish, cover with foil and bake for 30 minutes, or until cooked through. Remove from oven and allow chicken to cool off completely. 
2. Meanwhile, make a dressing by combining the remaining lemon juice with coconut milk, sugar and lemongrass (if using). Simmer for 5 minutes, stirring to allow the sugar to dissolve. Remove pan from heat and allow dressing to cool.
3. Steam/blanch the beans until just starting to soften (it should still retain some crispness). Refresh under cold water to stop the cooking process.
4. Roughly shred the chicken and combine with the dressing in a salad bowl. Add the beans, cucumber, mangetout, mint, chili flakes, coconut and sesame seeds and toss well. Season to taste and serve with lime wedges.

Nutritional info (per serving): Calories 254.8, Total fat 12.2 g, Saturated fat 6.7 g, Polyunsaturated fat 2.3 g, Monounsaturated fat 1.5 g, Cholesterol 38.0 mg, Sodium 193.1 mg, Potassium 254.9 mg, Total carbohydrate 15.6 g, Dietary fiber 3.5 g, Sugars 6.3 g, Protein 18.6 g

Good source of: Vitamin C 64.3 %, Iron 21.0 %, Calcium 15.6 %

Friday, January 29, 2010

Teriyaki Chicken Salad


You know what I hate? Getting to that place where you know it's become time to move on. Again.

Whether it's in my personal life or professional life, it always leaves me with an unsettling feeling deep down in my stomach. Change is good (and sometimes very necessary), but it's never nice leaving those now-very-comfortable people and places behind. Even though they might now irritate the living daylights out of us. Or actually be harmful to our wellbeing.


Sometimes there's nothing wrong with the current situation, but you also know that it's just never going to be anything more. Zero future opportunities. Know what I mean? Those are the hardest ones to let go of. Because it's still nice, it's still "lekker", it's just not good for you. Kind of like sometimes you have to pass up the chocolate bar for a piece of fruit, which will be both refreshing and delicious. But boy, sometimes it's hard to walk away from that chocolate bar...

This salad is not a chocolate bar, but like the metaphorical piece of fruit, it is both refreshing and delicious. And I think, ultimately, that's the way to go. 

Teriyaki Chicken Salad
Serves 4

4 chicken breasts (skinless & boneless)
3 tbsp teriyaki sauce
1 tsp minced garlic
1 tsp vegetable oil
1/2 cabbage, finely shredded
150g mangetout, sliced in half lengthways
1/4 cup coriander, finely shredded 
salt & pepper, to taste

For the dressing:
1 tbsp sunflower oil
2 tbsp teriyaki sauce
1 tbsp lemon juice
1/2 tsp minced garlic
1/2 tsp ground ginger

1. Combine teriyaki sauce and garlic in a bowl, add chicken breasts, cover and allow to marinate for 10 minutes.
2. Heat oil in a medium frying pan over medium heat, then add chicken breasts and cook for 4 -5 minutes either side or until cooked through. Remove from the pan and allow to cool.
3. Meanwhile, toss cabbage, mangetout and coriander together. 
4. Combine all the ingredients for the dressing and drizzle over the cabbage salad. Season with salt and pepper to taste.
5. Divide the cabbage salad among individual serving plates. Carefully slice the cooled chicken breasts into thin slices, and fan atop the cabbage salad. Serve immediately.

Nutritional info (per serving): Calories 372.9, Total fat 7.9 g, Saturated fat 1.3 g, Polyunsaturated fat 3.8 g, Monounsaturated fat 1.6 g, Cholesterol 136.9 mg, Sodium 6161.8 mg, Potassium 1266.7 mg, Total carbohydrate 14.7 g, Dietary fiber 4.1 g, Sugars4.5 g, Protein 59.5 g

Good source of: Niacin 142.7 %, Vitamin C 103.2 %, Vitamin B6 81.9 %, Phosphorus 76.7 %, Selenium 62.4 %, Magnesium 48.5 %, Iron 34.2 %, Folate 27.9 %, Calcium 24.2 %

Wednesday, January 13, 2010

Chicken Satay

Photo of Chicken Satay

Mark this date on the calendar people! For the first time I'm actually posting the Daring Cooks recipe on time! Third time lucky as they say.

Besides marking the calendar though, you should definitely bookmark this recipe.

The January 2010 DC challenge was hosted by Cuppy of Cuppylicious and she chose a delicious Thai-inspired recipe for Pork Satay from the book 1000 Recipes by Martha Day. 
I haven't had satay before (gasp, shock, etc); it was one of those things I'd been meaning to try but never got around to - you know how it goes. Take it from me: if you haven't tried satay before, put everything down, gather the ingredients and get your marinade going right now.That is an order. From the Yum Police!

Okay that was cheesy, but I promise you'll forgive me after you've tasted the peanut-y creamy goodness that is satay sauce. Honestly, I considered drinking this stuff straight, so awesome was it. Now what are you still waiting for?

Chicken Satay
Adapted from 1000 Recipe Cookbook by Martha Day

Serves 4

500g skinless boneless chicken breasts
1/2 medium onion, roughly chopped
1/2 tbsp minced garlic
1/2 tsp ground ginger
2 tbsp lemon juice
1 tbsp soy sauce
1 tsp ground cumin
1 tsp ground coriander
1/2 tsp ground turmeric
2 tbsp vegetable oil

For the peanut sauce:
(this makes roughly double the amount needed)

3/4 cup coconut milk
4 tbsp peanut butter
1 tbsp lemon juice
1 tbsp soy sauce
1 tsp sugar
1/2 tsp ground cumin
1/4 - 1/2 tsp chilli powder

1. For the marinade - puree the onion, garlic, ginger, spices, lemon juice and oil until smooth in a food processor.
2. Cut each chicken breast into 2 or 3 long strips. Add chicken to the marinade and ensure the chicken is evenly coated all over. Cover and leave to marinade in refridgerator for 2 - 12 hours. (I marinated mine in the morning and the chicken was ready for the grill at supper time.)
3. Remove chicken from marinade (but don't scrape the marinade off). Thread each strip onto a skewer and place under the grill for about 15 minutes, turning once to ensure even browning.
4. Meanwhile, make the peanut sauce, by combining everything in a bowl and gently microwaving it to melt the peanut butter and thicken the sauce.

Serve chicken skewers with the peanut sauce to dip. 
Nutritional info (per serving): Calories 312.1, Total fat 17.8 g, Saturated fat 6.0 g, Polyunsaturated fat 3.7 g, Monounsaturated fat 6.8 g, Cholesterol 72.5 mg, Sodium 464.9 mg, Potassium 506.9 mg, Total carbohydrate 6.5 g, Dietary fiber 1.4 g, Sugars 1.6 g, Protein 32.1 g

Good source of: Niacin 77.3 %, Vitamin B6 39.2 %, Selenium 33.3 %, Phosphorus 31.3 %, Manganese 23.0 %

Thursday, December 10, 2009

Oregano Chicken Skewers


Summer calls for swanning around in next-to-nothings, sultry sounds and sipping on colourful cocktails. It also calls for skewered food. Can you hear it? Skeeeeeeeeeeeeee-weeeeeeeeeeeeeeers. Okay maybe that's just me.


These skewers will have you calling out for more though. Even if you aren't swanning around in next-to-nothings. And let me just say, apricots are a very under appreciated fruit. Especially when it comes to skewers. They add a delightful tang to the other ingredients. Try them skewered and wrapped in bacon - it is truly divine.

Oregano Chicken Skewers

Inspired by The Culinary Sherpas

Serves 4

500g skinless boneless chicken breasts
juice from 1 lemon (approx 2 tbsp)
1 tsp dried oregano
1 tsp minced garlic
1 tsp salt
4 tbsp plain lowfat yoghurt
8 largeish button mushrooms
4 apricots, pitted and halved
1 tbsp olive oil

1. Cut chicken into bite-sized cubes, then marinate in a mixture of the lemon juice, oregano, garlic, salt and yoghurt. Leave to soak up the flavours for an hour.
2. Thread the chicken, mushrooms and apricots onto skewers and place on a baking tray.
3. Bake at 180C for 20 - 25 minutes until chicken is cooked but still tender.
Nutritional info (per serving): Calories 205.8, Total fat 5.5 g, Saturated fat 1.1 g, Polyunsaturated fat 0.7 g, Monounsaturated fat 3.0 g, Cholesterol 73.4 mg, Sodium 675.4 mg, Potassium 577.0 mg, Total carbohydrate 7.3 g, Dietary fiber 1.3 g, Sugars 5.2 g, Protein 31.4 g

Good source of: Niacin 78.2 %, Vitamin B6 38.6 %, Phosphorus 30.8 %, Selenium 37.3 %, Riboflavin 18.5 %

Tuesday, November 17, 2009

Tandoori Chicken Kebabs


I feel like a naughty child today. I signed up for my first ever Daring Cooks challenge and what did I go and do? Miss the deadline! I somehow got the dates mixed up or something.  I intended to make it on Saturday (but then never got round to it - we went shopping instead!), but for some reason didn't realise that the reason I had it earmarked for Saturday was because the due date was Saturday. Oy vey.


I do still intend on making it, just obviously rather late. And while everyone already knows that the November challenge was homemade sushi, what I can say about my particular version is that I got a little bit creative with the interpretation thereof. Yes, I went all fusion on yo asses! But you'll have to tune in for my next post where I'll reveal all about that. Yes, yes, I know, the suspense is killing you softly. ;-)

Back to the current post however, which has absolutely nothing to do with the Daring Cooks challenge, but everything to do with lip-smackingly good chicken. Yes, it's tandoori chicken. Something I'd been wanting to try my hand at for some time now. 'Cause you know it's just one of those classic must-make Indian dishes. Like butter chicken. Or Rogan Josh. See? A bit of shameless self-promoting never hurt anyone... 

Back to the tandoori though - it was exactly the way I wanted it to be. Succulently spicy chicken threaded onto a kebab and served with some raita on the side - it's hard to imagine a more casually delicious supper. 


Tandoori Chicken Kebabs

Spice mix adapted from Chicken Farmers of Canada

Serves 4

600g chicken breast fillets
1 tsp cumin seeds
1 tsp coriander seeds
1 tsp cardamom pods
1/4 tsp whole cloves
1 bayleaf
1 tsp salt
1 tsp chilli powder (or use 1 or 2 fresh chillies, finely chopped)
2 tsp paprika
1 tsp ground turmeric
1/2 tsp ground cinnamon
1 tsp minced garlic
2 tbsp lemon juice
1/4 cup plain lowfat yoghurt

1. Cut chicken into bitesize chunks and set aside.
2. Finely grind the cumin, coriander, cardamom, cloves & bayleaf in a pestle & mortar (or cheat like I do and use a coffee bean grinder - works like a charm). The bayleaf won't grind to a powder, that's okay. Mix with the rest of the spices, lemon juice and yoghurt.
3. Work the marinade into the chicken using your hands, ensuring all pieces are fully coated. Cover with clingfilm and allow to marinade for 30 - 40 minutes in the fridge.
4. Thread the chicken pieces onto kebab skewers and grill in the oven at 200C until done. Be careful to not overcook them, they will still be tasty, but a little bit too dry. I found 15 minutes did the trick.

Serve with tomato wedges and a cucumber raita.

Nutritional info (per serving): Calories 163.9 , Total fat 2.0 g, Saturated fat 0.2 g, Polyunsaturated fat 0.1 g, Monounsaturated fat 0.2 g, Cholesterol 69.4 mg, Sodium 1005.7 mg, Potassium 85.2 mg, Total carbohydrate 4.9 g, Dietary fiber 1.6 g, Sugars 1.3 g, Protein 30.0 g

Friday, October 30, 2009

Butter Chicken

Butter Chicken photo

It's 2 am, I can't sleep, so what's a girl to do? Blog it would seem.You'd think I would be tired after all the garage cleaning and flat organising I did the past two days. Who knew housework would be such a great workout? Time to rethink that gym membership methinks...


Anywhoo, on to the food. Seeing as I was at home I thought this would be the perfect opportunity to try out butter chicken accompanied by home-made naan (stay tuned for that in the next post, but let me just say it was freakin' amazing!). You see I needed time for the chicken to marinade for an hour. Time I normally do not have on a weeknight. Yes, technically you could apply the marinade in the morning to be ready for cooking straight after work, but the not-so-organised girl inside me knew that wouldn't be happening. To the organised people out there - this is actually the perfect weeknight meal if you've already done the marinating legwork. After that the dish comes together in about 30 minutes.

Butter chicken is one of the most popular Indian curries around and a fixture on many a restaurant and takeout menu. This particular version is super flavourful and dare I say better than our local Indian restaurant's version. The chicken comes out meltingly soft (must be the marinade?) and the sauce is so good you almost want to pour it into a cup to drink. Oh go ahead, I won't judge...


Butter Chicken
Adapted from Some More Please! 

Serves 4

Marinade:
2 tsp minced garlic
1 tsp ground ginger
1 tbsp lemon juice
1 tbsp mild curry powder
2 tsp paprika
1 tbsp oil

500g skinless boneless chicken breast fillets, cubed
1 tsp oil
1 tbsp butter*
1/2 medium onion, chopped very finely
1 tsp minced garlic
1 tsp ground ginger
1 1/2 tsp salt
1 tbsp sugar
3 tbsp tomato paste
1 cup water
1/2 cup low-fat cream

1. Mix marinade ingredients together to form a paste, rub into chicken, cover and refrigerate for an hour to let the flavours soak in.
2. Heat oil and butter in a large saucepan. Add chicken and brown over high heat. Remove chicken and set aside.
3. Add the onions to the same pan and fry over medium heat for 3 - 5 minutes until soft. Add garlic, ginger, salt, sugar and tomato paste and cook for another minute, then add water. Increase heat until sauce starts to boil, then decrease heat and simmer, covered for 10 minutes. Sauce should start to thicken.
4. Add cream and chicken, cover again and simmer for another 10 - 15 minutes until chicken is cooked through. Serve with naan or steamed basmati rice.

* I didn't have ghee, so used butter instead. If you have ghee, by all means use it. But I figured, hey, it's called butter chicken, so I'm sure a little butter won't hurt. Right?
Nutritional info (per serving): Calories 247.5, Total fat 11.9 g, Saturated fat 4.4 g, Polyunsaturated fat 1.7 g, Monounsaturated fat 4.5 g, Cholesterol 76.1 mg, Sodium 1240.8 mg, Potassium 263.5 mg, Total carbohydrate 10.1 g, Dietary fiber 1.9 g, Sugars 1.8 g, Protein 26.1 g

Good source of: Manganese 20.7 %

Thursday, October 15, 2009

Curried Chicken Noodle Soup

I've been feeling a bit under the weather for the last few days. It started with a scratchy throat on the weekend and progressed into some minor sniffles yesterday. Highly annoying as we're just entering spring - colds should be a thing of the past now! 


Anyway, as everyone knows chicken noodle soup is just the thing to beat the sniffles right out of the door.

Add to that some curry powder to burn those virusses on their way out and you've got a winning team! This was truly a delicious soup, so simple but with so much flavour. Received the thumbs-up from TheHusband as well, although that shouldn't really be such a surprise, chicken lover that he is.

Curried Chicken Noodle Soup

Adapted from Bowl Food

Serves 4

1 tbsp oil
220g skinless chicken breast
1 medium onion, sliced
1 tsp ground ginger
1 tbsp garam masala
1 tsp turmeric
3 cups chicken stock
1 cup water
1 can (400ml) light coconut milk
180g thin dried egg noodles
125g babymarrows
1/3 cup fresh basil, torn

1. Heat the oil in a wok over high heat. Add whole chicken breasts and cook for about 8 minutes, turning once to brown evenly. Chicken should be almost cooked but with a little bit of pink in the middle. (Don't worry we're going to cook it a little bit more later on). Set chicken aside.
2. Fry onion in the same wok over medium heat for another about 5 minutes, or until soft. Add ginger, masala and turmeric, fry another 30 seconds to release the flavours, then add chicken stock and water. Bring to a boil, reduce heat and simmer for 20 minutes.
3. Slice the chicken thinly.
4. Add the coconut milk to the saucepan and simmer for 5 minutes. Now add the noodles, babymarrows and sliced chicken and let cook for another 5 minutes - noodles will be cooked through and babymarrows tender. Chicken should be fully cooked at this stage.
5. Lastly stir in the basil and serve piping-hot.

Nutritional info (per serving): Calories 405.0 , Total fat 14.3  g, Saturated fat 1.5 g, Polyunsaturated fat 2.2 g, Monounsaturated fat 3.9 g, Cholesterol 76.9 mg, Sodium 304.6 mg, Potassium 610.5 mg, Total carbohydrate 41.3 g, Dietary fiber 3.0 g, Sugars 2.9 g, Protein 25.7 g

Good source of: Selenium 57.9 %, Niacin 49.4 %, Manganese 35.3 %, Phosphorus 28.7 %, Vitamin B6 28.4 %, Vitamin C 24.1 %,

Tuesday, June 30, 2009

Moroccan picnic


TheHusband and I had an indoors picnic for Valentine's Day ('cause you know, that's just how we roll...). 

 
On the menu were the following:

- Lemony garlicky chicken wings, because what says amor better than garlic? Huh?
- Flatbread, that turned out more bread than flat
- Dukkah, olive oil and balsamic vinegar for dunking said bread into (and boy did we dunk!)
- Black olives in a minty balsamic marinade
- Sparkling red wine, courtesy of JC Le Roux
- Fried halloumi, firm favourite of TheHusband
- Roasted red pepper and aubergine cubes dressed with even more balsamic (notice a trend here?)

Let's just say it was the perfect recipe for some spicy romance!

Moroccan picnic

Some pics I discovered of the food I made for hubby & I for a Valentine's picnic (moved indoors because of the wind & our laziness) with a Moroccan theme.

The menu was as follows:

Roasted Red Pepper & Aubergine Chunks drizzled with Balsamic syrup, olive oil & copious amounts of fresh mint.
Fried Halloumi - Halloumi coated with spicy flour (salt & pepper, paprika & a tiny bit of chilli powder)
Garlicy-Lemony Chicken Wings - 'nuff said...
Homebaked Not-so-flat Bread - I used part whole-wheat flour which made it a bit heavier than intended. You live, you learn.
Dukkah - to dip the not-so-flat bread in
Olive oil/Balsamic - to dip the not-so-flat bread in
Minted Marinated Olives - using pretty much the same flavourings as for the red pepper & aubergine, just subbing plain balsamic for the balsamic syrup.

And of course lovely chilled sparkling wine.

Oh, and my lovely hubby!
 

test blog Copyright © 2006 - 2010 Adaption of Cookiez Template, designed by Ipietoon for Free Blogger Template